Home
NextJS 13: Google Analytics in Consent Mode with Cookie Banner
This post will show you how to setup Google Analytics 4 Consent Mode inside a NextJS 13 application (using the new App Router) with TypeScript. Consent mode will ask the user for consent before storing cookies in the browser. With consent mode, basic Google Analytics still works however additional data will be added once consent is granted. This implementation helps to achieve GDPR compliance.
This tutorial presumes that you already have a NextJS 13 application setup and are using TailwindCSS. If not, please set both of these up first.
Packages
To get started, we need to install the following packages:
npm install client-only
This new NextJS 13 feature, allows us to define certain files to only be run on the client. We'll use this when accessing local storage in the browser to store cookie consent.
npm install @types/gtag.js --save-dev
This adds the type definitions for Google's gtag.js script which is required only if you're using TypeScript.
Setup Google Analytics
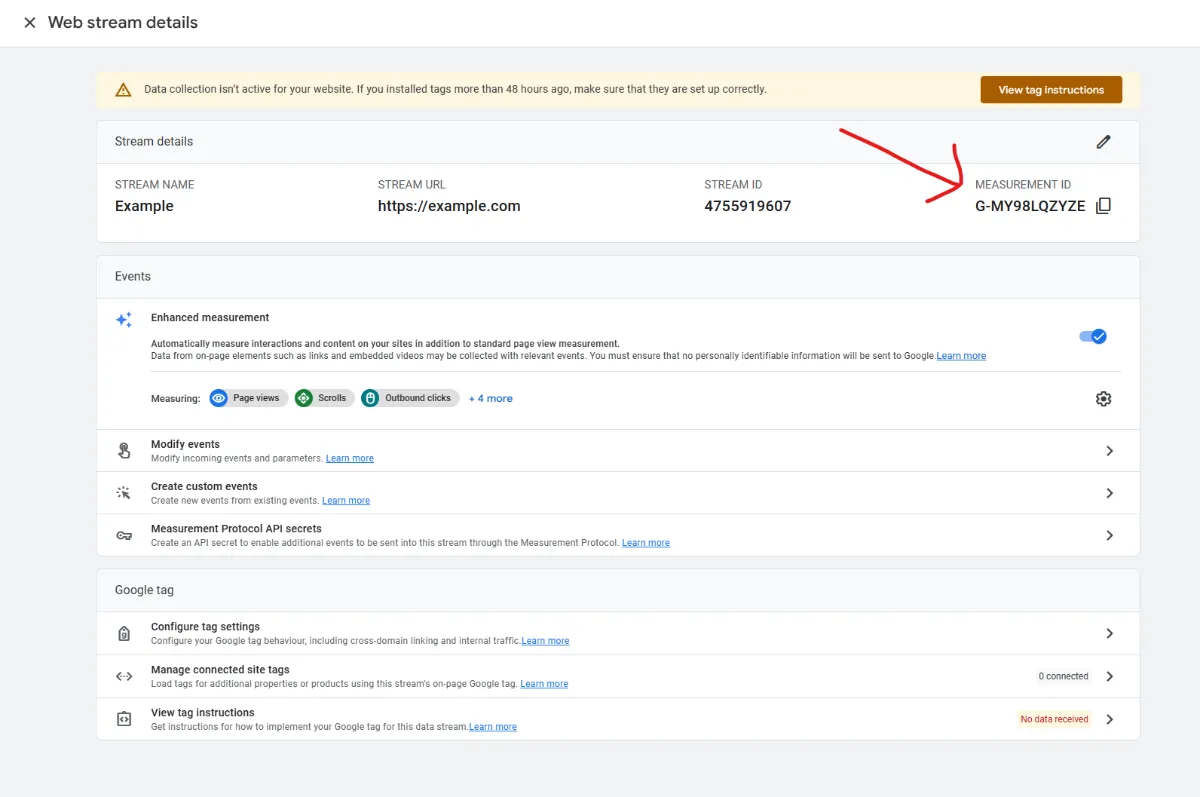
First step is to setup Google Analytics. To follow along with this post, you'll need the Measurement ID of a Web Data Stream.
 Add Google Analytics to NextJS 13
We're first going to build a Google Analytics component which will store the basic gtag.js code which interacts with Google Analytics.
At the top of this file, we use use client in order to ensure it will only be run locally rather than server side.
We then copy the 2 recommended scripts from google into the body of the component - making sure to create the property GA_MEASUREMENT_ID.
Within the second script we can see the newly added "consent" section that will default the analytics_storage cookies to denied. This is using Google Analytics Consent Mode and we can then override this consent once the user accepts cookies.
// components/GoogleAnalytics.tsx
'use client';

import Script from 'next/script'

export default function GoogleAnalytics({GA_MEASUREMENT_ID} : {GA_MEASUREMENT_ID : string}){
    return (
        <>
            <Script strategy="afterInteractive"
                src={`https://www.googletagmanager.com/gtag/js?id=${GA_MEASUREMENT_ID}`}/>
            <Script id='google-analytics' strategy="afterInteractive"
                dangerouslySetInnerHTML={{
                __html: `
                window.dataLayer = window.dataLayer || [];
                function gtag(){dataLayer.push(arguments);}
                gtag('js', new Date());

                gtag('consent', 'default', {
                    'analytics_storage': 'denied'
                });

                gtag('config', '${GA_MEASUREMENT_ID}', {
                    page_path: window.location.pathname,
                });
                `,
                }}
            />
        </>
)}
We then need to import & add this new Google Analytics component to our root layout which can be found in app/layout.tsx.
import GoogleAnalytics from '@/components/GoogleAnalytics';
When adding to our root layout, make sure to replace GA_MEASUREMENT_ID with your own Measurement ID from Google Analytics.
// app/layout.tsx
<html lang="en">
    <GoogleAnalytics GA_MEASUREMENT_ID='G-0000000000'/>
    <body>{children}</body>
</html>
Google Analytics for SPA (Single Page Applications)
At this point, Google Analytics is setup on our site however it won't work as expected. NextJS is a SPA (Single Page Application) meaning that all pages are loaded upfront. This means that page changes are virtual and don't require a full load of a new page.
By default, Google Analytics will not report page changes in NextJS. To fix this, see below:
First we create a gtagHelper.ts file which will store our helper method. The pageView method below will report a new page view to Google Analytics which we can then call when we change pages in our SPA (Single Page Application).
// lib/gtagHelper.ts

export const pageview = (GA_MEASUREMENT_ID : string, url : string) => {
    window.gtag("config", GA_MEASUREMENT_ID, {
        page_path: url,
    });
};
We are going to call pageview when the URL of our app changes. To do this we will use the useEffect cook to listen to changes on both the pathname and the search params of the URL.
We can add the following imports to our GoogleAnalytics component.
// components/GoogleAnalytics.tsx

import {usePathname, useSearchParams} from 'next/navigation'
import { useEffect } from "react";
import {pageview} from "@/lib/gtagHelper"
We can then add the following code to the component to listen to changes of both pathname & searchParams and report a new page view when either of these change.
// components/GoogleAnalytics.tsx

export default function GoogleAnalytics({GA_MEASUREMENT_ID} : {GA_MEASUREMENT_ID : string}){
    const pathname = usePathname()
    const searchParams = useSearchParams()

    useEffect(() => {
        const url = pathname + searchParams.toString()

        pageview(GA_MEASUREMENT_ID, url);

    }, [pathname, searchParams, GA_MEASUREMENT_ID]);
Cookie Banner React Component
Now we have google analytics working for NextJS 13, including when we change pages. However, this is currently not GDPR compliant as it will use cookie tracking by default. We need to use Google Analytics Consent Mode in order to allow users to opt-in to cookie tracking.

To start will, we'll add a new mobile responsive component called Cookie Banner which will allow our users to opt-in or opt-out of cookies. Copy the code below into a component called cookiebanner.tsx.
// components/cookiebanner.tsx

'use client';

import Link from 'next/link'

export default function CookieBanner(){
    return (
        <div className={`my-10 mx-auto max-w-max md:max-w-screen-sm
                        fixed bottom-0 left-0 right-0
                        flex px-3 md:px-4 py-3 justify-between items-center flex-col sm:flex-row gap-4
                         bg-gray-700 rounded-lg shadow`}>

            <div className='text-center'>
                <Link href="/info/cookies"><p>We use <span className='font-bold text-sky-400'>cookies</span> on our site.</p></Link>
            </div>


            <div className='flex gap-2'>
                <button className='px-5 py-2 text-gray-300 rounded-md border-gray-900'>Decline</button>
                <button className='bg-gray-900 px-5 py-2 text-white rounded-lg'>Allow Cookies</button>
            </div>
        </div>
    )}
With our component built, we can now import it and add it to our root layout so it appears on every page:
// app/layout.tsx
import CookieBanner from '@/components/CookieBanner';
// app/layout.tsx
<html lang="en">
    <GoogleAnaytics GA_MEASUREMENT_ID='G-0000000000'/>
    <body>
        {children}
        <CookieBanner/>
    </body>
</html>
We can now add the functionality to it to opt-in or out of cookies.
Google Analytics Persistent Consent using The Google Tag (gtag.js)
With our cookie banner, we will request consent from the user the first time they visit the site. We will then save this choice, meaning that on all subsequent visits to our site we will remember their preferences.
The first file we can create, is storageHelper.ts which is responsible for storing & retrieving values from local storage.
Here we can see that we're using client-only in order to ensure that this is run in the client only (as localStorage is not accessible on the server).
// lib/storageHelper.ts

import "client-only";

export function getLocalStorage(key: string, defaultValue:any){
    const stickyValue = localStorage.getItem(key);

    return (stickyValue !== null && stickyValue !== 'undefined')
        ? JSON.parse(stickyValue)
        : defaultValue;
}

export function setLocalStorage(key: string, value:any){
    localStorage.setItem(key, JSON.stringify(value));
}
We can now import the storage helper methods as well as useState and useEffect into our cookie banenr file.
// components/cookiebanner.tsx
import { getLocalStorage, setLocalStorage } from '@/lib/storageHelper';
import { useState, useEffect } from 'react';
To use these, we can update our cookie banner to the following.
Here we are setting up a state called cookieConsent which defaults to false.
We then have our first useEffect hook that is called when the component loads. This fetches the cookie_consent value from local storage and defaults to null if this key is not found. We then set the cookieConsent state to this pre-stored value.
The first useEffect block is responsible for grabbing the user's preferences. The second useEffect is used to update Google Analytics with these preferences.
In this second block we check the value of cookieConsent. If it's true, we update gtag's consent to "granted" else we default to "denied".
Within the second block, we also save the preferences back to localstorage so that we don't have to ask the user every time.
// components/cookiebanner.tsx
export default function CookieBanner(){

    const [cookieConsent, setCookieConsent] = useState(false);

    useEffect (() => {
        const storedCookieConsent = getLocalStorage("cookie_consent", null)

        setCookieConsent(storedCookieConsent)
    }, [setCookieConsent])


    useEffect(() => {
        const newValue = cookieConsent ? 'granted' : 'denied'

        window.gtag("consent", 'update', {
            'analytics_storage': newValue
        });

        setLocalStorage("cookie_consent", cookieConsent)

        //For Testing
        console.log("Cookie Consent: ", cookieConsent)

    }, [cookieConsent]);
Finally, we can update our Allow and Decline buttons on our cookie banner to set the cookie consent to either true of false.
// components/cookiebanner.tsx
<button className='...' onClick={() => setCookieConsent(false)}>Decline</button>
<button className='...' onClick={() => setCookieConsent(true)}>Allow Cookies</button>
Check Google Analytics Consent Mode
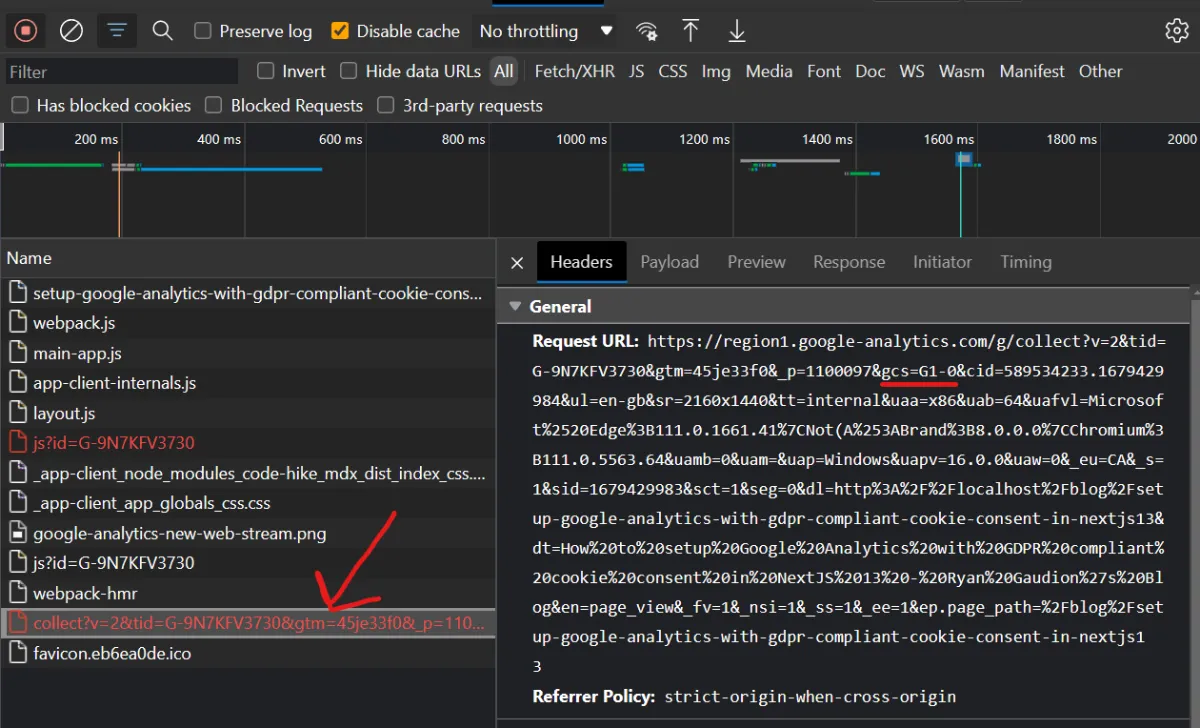
To ensure that our Consent is working, we can look at the Network Tab of Developer Tools in your browser. If you look for the "collect" request we can take a look at the URL of this request.
We are looking for the gcs section of the request. The last 2 digits tell as the consent status of both:
Analytics Storage and Ad Storage.
gcs=G100- means that both Ad Storage & Analytics have been deniedgcs=G111- means that both Ad Storage & Analytics have been grantedgcs=G1-0- means that both Ad Storage hasn't been set and Analytics has been granted

Hide Cookie Banner if consented
The final thing to do is to hide the cookie banner once the user accepts cookies. We can do this by replacing the flex className with the following:
// components/cookiebanner.tsx
<div className={`...
    ${cookieConsent != null ? "hidden" : "flex"}
    ...}>
Conclusion
And that's it - you now have a cookie banner setup that prompts for Cookie Consent, using Google Analytics.
There are still many areas of improvement, including:
- Allowing users to change their consent option
- Re-Asking for permission every 6 months
If you found this tutorial helpful, feel free to share it and if you have any questions, feel free to Get In Touch
Related Blogs
If you found this tutorial useful and would like to start your own Next.js Blog, here are some other posts that you may be interested in: